Thursday, August 7, 2014

No Longer In A (Complete) Sea Of Chaos

I've been making cards - that have no sentiments on them. And the reason they have no sentiments is because my stamps were a disorganised mess. I mean, like really a mess. I've been meaning to do something about it, but there were so many other things I had to do... yeah, yeah, yeah. Excuses, excuses.

I've been looking at craft room tours on YouTube and there are so many different ways that people organise and store their stamps. Binders, bags, boxes, baskets... oy vey! Which to choose!?!

I think the best way to organise something is to think about the way that you use it. Not the way others use it - but the way you actually, in real life - not that perfect world we all like to imagine we live in, but the real world where we aren't as neat or organised or as careful as we like to be - yeah, that world... look at the way you really are and how you really use things and care for them.

As you can see from the "Before" picture, my craft room is kind of a mess and disorganised and is likely to get that way again, even after I get all my (expletive deleted) stuff together. And if something lands on the floor, there's a good chance it may stay there for a while. So, knowing myself in the real world, I knew I needed something sturdy that was going to keep my stamps in good condition, even if they fell on the floor or my dogs got loose in my craft room.

Some of my stamps have dies with them (even though I don't have a Big Shot yet, I'll get there!) so I needed something to hold the stamps securely so they wouldn't get ruined if kicked, stomped on or chewed, and it would have to hold the coordinating dies if there were any. So I opted for the dvd box solution.

I found a company online that sells them pretty cheaply and without the dvd holder insert. They also sell adhesive backed magnetic sheets that fit inside the box so that you can include your dies if you have them.

I got them in today so I actually was very good and went right to getting all my stamps in the boxes and labeled. I still have to get all of them stamped into my sample book so that I know what I have when I'm working on a project, but now I at least can see what I have. I was even extra good and used my label maker to put the name of the manufacturer, and the name and number of the stamp set on the front of each box. (I'm now out of label tape.) And I will try to remember to buy thinner label tape as well so that I can put that same information on the side of the box.

I boxed them all by manufacturer as that's how I plan to mark them in the samples book, and I put as many sets in the box as would fit, so some have two or three sets.

I have them here in two dvd holders that I got at Goodwill for a dollar a piece, but they aren't very sturdy. Eventually, I'd like to get all of them in drawers - that I have yet to buy. I'm still working on getting my (expletive deleted) stuff together.

In my craft room, I have a counter-height work surface from IKEA with two sets of 2x2 Kallax shelves holding it up. I still have to figure out exactly where in the room it's going to go. (Middle? Against the wall? Which wall? Hmm...)

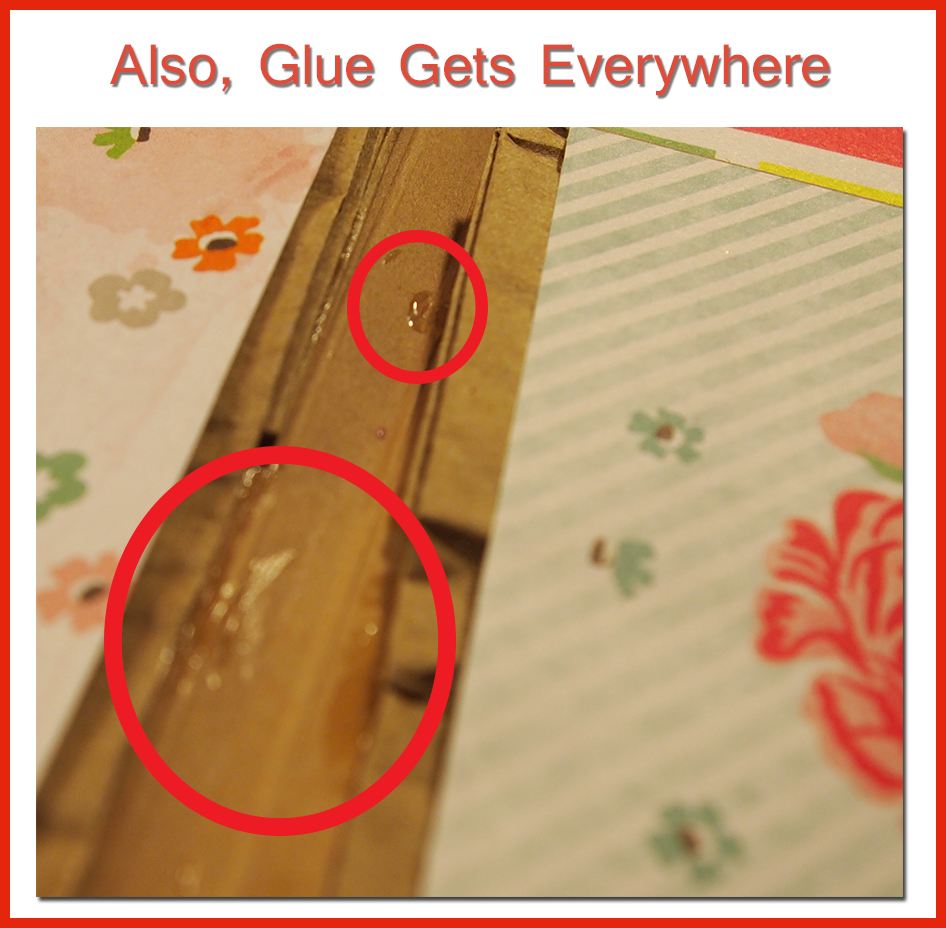
I got a great buy on a used L-shaped desk ($25!) that I will get into the room as soon as I get the room painted. Right now, it's red (see picture), which is seriously the wrong colour for a craft room because all of my papers, inks, etc. look kind of pink whenever I'm working on something. We have the primer and the paint, we just have to find the time to get it painted. Sound familiar?

But I have one less disorganised spot in my life tonight, so I'm pretty happy.


Note: I receive no money, products or anything else from this - I don't think they have any idea I even exist - but if you want to know where I got the dvd boxes and inserts, click for TapeOnline.com's Clear Super Jewel Box Disc Holder and Magnetic Inserts. They sell them for rubber stamps and dies, so they work perfectly.

Sunday, August 3, 2014

Playing With My Stash

I've run low on solid coloured cardstock and while I'm waiting for my order to come in, I thought I'd play with the kraft and black that I do have and see what I could do with it. I wanted to see if I could do something other than folksy or vintage looks you normally see done with kraft and black.


I pulled out my Mariposa mat stack and made some kraft card blanks and started playing. I was amazed and how elegant the kraft and black could look when paired with the right papers, inks, and embellishments.


Tuesday, July 22, 2014

The Book for Mary's Children

In case you haven't been reading this blog, a good friend of mine died on May 3rd. She was thirty-three and had just given birth a week earlier to her third child.

Having children myself, I couldn't - didn't want to - imagine Mary's children growing up without knowing their mother, so I decided to make a scrapbook for them and asked some of her friends to write about Mary, letters that I would include in the book.

Today, I finished it. In a way I am glad that it is done, so that I can finally give it to her children and her family and they can fill it with pictures and letters themselves, sharing memories about this beautiful woman, wife and mother for her children to cherish as they grow up.

But... I'm sitting here crying as I type this because now that it is finished... While I was working on it, I felt a connection to Mary. We had lost her, but she was still something I could hold onto while I spent many bittersweet hours making this book for her children. She's gone. She's really gone. And I have to let go.

(Image heavy under the cut...)

Monday, June 16, 2014

Buy A Stylus - Now

The very first thing I think that any crafter who makes cards or mini albums or envelopes or almost any paper project should tell you - but don't - is buy an embossing stylus.

I don't know why they don't. It sure would have saved me a few headaches and curse words. I watched some classes and heard a few offhand "Don't use the scorer that comes with this board" on most of them, but they didn't tell me what I should be using instead. I saw this little stick doohickey in their hand, but I never got a good look at it and I didn't know what it was called. And I looked and looked and looked at the Michaels and Joanns and occasional dedicated scrapbooking stores that I went to (I don't have a local one), but never saw anything like it until about a week ago.

Martha's come in a set of three.
I found the Martha Stewart set of embossing styluses at a Michaels and grabbed them up like they were gold. And wow, what a difference! My paper doesn't tear or get ripped to shreds by the serrated edges like it does on one of the scoring tools I have (that came with one of the scoreboards I bought). Seriously, what kind of idiot puts serrated edges on something used for paper?

Apparently, there are all kinds, made by many different manufacturers, but I didn't know that - mostly because I didn't know the name of the thing. I kept looking for a scoring tool and coming up with nada. It's called an embossing stylus.

Round tip - doesn't that just make sense?
The trick, you see, is in the tip. It's round. Because what else would make it if you're using it on paper and don't want it to tear? You wouldn't be dumb enough to make it pointy or serrated, would you? Well, pointy and/or serrated is what you get with all of the (three) score boards that I bought.

I'm using the middle one that has a small(ish) ball on one end and a large(ish) ball on the other. I've use the smaller end so far (on the Martha Stewart scoreboard and the We R Memory Keepers Envelope Punch board). There are two more with pointier ends and another balled end, but I don't want to grab the pointy end by mistake, so I use the one with two balled ends.

 Why more stores don't carry them, I have no idea. And why online crafters don't tell every newbie to get one of these - and pronto - is also a mystery.

So I'm telling you. Go on Google or Yahoo or Etsy or Ebay or whatever you search medium of choice is and get one, or two, of these. They'll save your paper, your temper and your loved ones eardrums.

Sunday, June 15, 2014

A Pop-Up Card in a Box

Today being Father's Day and all, I decided to make this sweet little box card for my husband. I followed the super-easy tutorial from papercrafter45 over on her YouTube channel [click here to go to the video]. This is the second tutorial of hers that I've followed and I can't tell you how wonderfully clear her directions are! Everything step-by-step, with crystal clear photos to make sure you get it exactly right.

If you're new to papercrafting, like I am, please do yourself a favour and go check out this channel. You won't be sorry!

The pop up box from the front

 I used Teresa Collins' World Traveler 6x6 paper pad for this project. I added some Tim Holtz tags and rub-ons and a couple of Jolee's tool stickers as well. I used Michaels' Recollections card stock for the box itself and I have to say that I am less than thrilled with it. As soon as I get the chance (and some money) I'm going to get a stash of both the Bazzill that Kathryn Kreiger at Kathryn Scraps recommends and the Paper Accents that Kathy Files from Paper Phenomenon uses and see if I like either of those better.

I'm still working on getting my matting perfectly straight - having a Band-aid on my thumb didn't help, either. (Tip: don't pare apples for a pie while trying to communicate something important to your spouse. One or the other will suffer.)

I did as she did in the tutorial and triple matted it and I was very pleased with the result. I didn't ink the edges of my paper, mainly because the box is a tiny 1 1/2" wide (not including the box flaps) by 3" tall and the only colour that I thought looked good was the dark Distress Inks' Walnut Stain and I didn't like all that darkness on my tiny box.

A side view
The only thing that didn't work for me is that my card did not fit in an envelope for a 3x3 card, as she said it would. Maybe I overfilled mine? No idea. But it wasn't really a problem,  because I just got out my We R Memory Keepers Envelope Punch Board and made one a little bigger (the 3 1/2 x 3 1/2" size) and that was just dandy. I had used the last piece of matching patterned paper for the 3x3 box, but I used a paper from the same collection for the second envelope, so it went well enough.

If you head over to papercrafter45's YouTube channel, tell her that Laine sent you!

Monday, May 19, 2014

Sleep - Or Lack Thereof, As It Relates To Crafting

So I didn't sleep well last night and was up and doing things at 7am (way early for me). Since I couldn't get back to sleep, I decided to go into my craft room and make something.

I've been away from crafting for a few weeks because I damaged my neck when we went to Chicago last month and my doctor gave me a list of things not to do - and sitting like I do when I craft was one of them. But I'm feeling better, so I trekked into the craft room this morning, turned on a Kathryn Kreiger video and proceeded to follow her directions to make a planner book.

I used a Velcro closure instead of magnets because I have Velcro and don't have any magnets at the moment.

It doesn't look bad in the pictures, but I can see all the places I messed up on. And my judgement concerning glue is apparently way off when I'm tired because I either used not enough glue or too much, depending on whether or not I was yawning. (Yawning = too much glue).

And, by the way, my doctor was right. My neck hurts right now. I even went so far as to put an ice bag on it. If I voluntarily put a big ice pack on my body, you know I messed up.

I'm going to go take a hot shower and then take a nap. And when I wake up, maybe I'll see if I can fix where the paper is coming off from not enough glue.

And then maybe put some embellishments on it because it looks a little plain to me. I realise that flowers and glitter wouldn't work well since this is meant to be toted around in a bag, but maybe I can come up with something. Pretty paper clips maybe? Hmm...


Saturday, April 12, 2014

Murphy's Law

Today I was going to do it; I was finally going to attempt my first mini-album and work along with Kathryn Kreiger's Crop Out Cancer event. I pre-cut all my paper. I pre-cut all my chipboard. I messed up my punched tabs and had to re-do but since I was doing this the day before the event, I got to re-do them and not get behind. I even pre-scored my pieces so that if I messed those up (scoring and I don't get along) I wouldn't have to re-cut while Kathryn got ahead of me during the class.

The one thing I didn't do? I didn't pre-tape all my pieces. And you guessed it, about thirty minutes in to the three and a half hour class, I ran out of double-sided tape.


You can be sure that in the future, I will make sure I have plenty of Scor-Tape or Miracle Tape on hand before I start a project because I did continue on with the class, using Scotch Quick Dry glue instead. There's a reason they tell you not to use glue on paper and I found it out today. It makes the paper wet and wavy and does not dry in nice, flat pieces - no matter how evenly you try to spread it.


Also, the glue gets kind of everywhere. And you don't always see it to get it off before it dries.


So I have the experience of making my first album - minus the cover because a migraine hit before the class finished, but I have my manual, so I can finish that up later if I want to. But I also have the experience of learning what not to do when making an album. And how bad it can look when you do it wrong.


So now you know some of the things not to do. When I get it right, I'll be sure to let you know. These are the adventures of a newbie scrapper, helping you not to make the mistakes I do.


Friday, April 11, 2014

Experimental Mode

I wanted to try some different techniques, so here are some more cards I've made for friends. The last two were made with very specific people and purposes in mind, so they're a bit different from the rest. These have all gone out in the mail; I'll work on the next batch when my grandson goes home - it's a bit hard to work when a three year-old wants to help.


This first set were made to try out different colour combinations and pearl effects and to see if I could get those butterflies to look like stained glass if I mounted them on vellum paper and then popped them up with foam dots to let the light shine through. I think it came out pretty well.


 This next set were made for specific people where I wanted a particular sentiment on the card.

I was also experimenting with colour combinations and embellishments.


These last two were made for my son (the purple one) and a friend I wanted to thank. I love those silver and black swirl stickers. I bought two packs of them and I'm going to do some experimenting to see what effects I can achieve with them.


Sunday, April 6, 2014

If You Want To Know What Nervous Looks Like...

This is actually my second set of cards. I mailed out the first set (well, the ones I didn't toss in the trash) without taking pictures of them because... well, because it just didn't occur to me to take pictures of them. But them some friends asked, so here they are.

While I do not mind constructive criticism, please remember that I am bipolar and on a down cycle before you get too "constructive". If you can't think of anything nice, its probably best not to say anything at all. (Especially if I know where you live.)

PS: I seriously suck at photography.

:takes a deep breath:  :closes eyes:


Thursday, April 3, 2014

Ouches and Organising


I have discovered that working on my scrapping at a table surrounded by shoe boxes full of supplies all around and on the floor is a ticket to shoulder and neck pain. So I'm going to have to get my craft room organised and get a higher table that I can stand at as I work.

We (my husband and I) are going to start by painting the room my favourite shade of lilac. Then my husband is going to build the modular shelf system that I devised so that I can add shelves and cubbies as my stash grows. I will post pictures of the before and after. The process itself will be chronicled on my website A DIY Home.

One problem that occurred to me was whether to paint or stain the 14"x28" cubbies that we're going to build. I wanted to paint them white so that any paints or papers will show as their true colours, but I didn't want to have scraped and chipped paint from where I was pulling things out to use them. And then the fates handed me a miracle. We often shop at the Habitat for Humanity Re-Stores, where they sell products left over from construction, and anything that was donated that wasn't usable to them. Someone had donated two pallets, five feet high, stacked with spray cans of car paint enamel. This is one of the most durable paints you can buy and very expensive (my husband and I used to do body work on cars to make extra money, so we've bought quite a bit of car paint in our time).


The problem was that each can was made for the paint for a specific make and model of car. So, while they ad plenty of white (most of then at the bottom of the pile), there were at least eight different shades of white, with the car make and model listed on the front. We spent quite a while with my husband shifting boxes while I found eighteen can of white that matched. Well, ten matched and the other eight match each other and the two colours are very close.

Since car paint is super chip-resistant, these shelves should look good for a long time.

Now, if you'll excuse me, I have to go open my new boxes of craft supplies. 


Saturday, March 29, 2014

Why I Hate Pinterest

I have just had to - for the eighth time in six months - change my Pinterest password.

Yes, Pinterest is a very useful tool that can help keep track of interesting things I find on the internet, but the hassle isn't worth the benefit. After I changed the password - yet again - I went to their Help Center to try to find out why they had put my account in "safe mode". Did the Help Center help me figure that out? Not in the least. And then they made the mistake of taking me to a survey page to ask me if their Help Center was "helpful".

My comment: No.

Their response: Please explain.

I still don't know why my account was in safe mode, and why I had to change my password (yet again) - a list that is ever-growing and includes more than 600 sites and you're making me change one (yet again) for a reason I still don't understand.  You say there was "suspicious activity". Perhaps it was that I was finally using your site - something I don't do often because I am a very busy woman who has little time to spend browsing makeup techniques and party favor ideas, let alone have time to think up yet another new password. Maybe it was because I log in from several locations - again, not uncommon for someone who spends 6 days a week in hotel rooms all over the country - and something very usual for my account. Maybe it was because you were bored and felt like pissing off another user. It certainly wasn't because there "suspicious activity" because there are no pins I did not put there, no pornographic or offense images, and no pins to categories I don't already use or inconsistent with things already on my boards.

The next time you put my account in safe mode, I'm canceling my account.


Tuesday, March 25, 2014

Organisation Woes

I am in the process of trying to get my craft room organised so that I can actually get a taller work table in there and get some work done without cramping my neck and shoulders. (See previous post.)

All of the options are both staggering and not quite what I want. I guess the trick is to find creative ways to make it work with the way you work. I've been watching hundreds of craft room tour videos and have not been overly enthused with anything so far. If you have something that works well for you, please let me know in the comments.

I'm also looking for a new paper trimmer - yet again. One that will actually cut my paper straight. I thought it was just me until I started reading all of these posts by people with the same problem. I can't afford a three hundred dollar one, so I'm going to see what I can get that will do the job with what money I have. Once again, suggestions are appreciated.


Sunday, March 23, 2014

Bloglovin'

Follow my blog with Bloglovin
You can now follow me on Bloglovin' if you like.

"http://www.bloglovin.com/blog/12001371/?claim=9qqajavatj2"


What They Don't Tell You When You Start Scrapbooking

So, I decided to take up scrapbooking/art journaling. I am, by nature, a creative person and I've been putting my creative energies into writing for the last fifteen years. But life has a way of messing with my brain and making me unable to concentrate on writing and I have desperately needed an outlet to help me get back into myself again. I found, by accident, a woman named Catherine Cotes on YouTube (her channel is creationsceecee). She was talking about a wallet in that video, but the rest of her channel is about art. She has a blog as well. This very talented woman got me re-interested in paper crafts and stamping - something I was into in my twenties, so its been a very long while.

And then I came across Kathryn Kreiger (KathrynScraps.com) and Kathy Orta (PaperPhenomenon.com) on YouTube, and they both inspired me and made me feel guilty about all the photos I have in boxes (somewhere) around the house. So I started trying things out and am now in the process of getting a craft room together. The first thing I thought I needed was a work table. But here's the thing that no one mentioned in all of the hundreds of YouTube videos I've been studying. When you do papercrafting, much of the time it's best to be standing up.

I brought in our old, long, foldable worktable that's kept on hand for Christmas and Thanksgiving. I even went out and bought a metal folding table when that one gave me splinters. But every time I go to work in there, I get serious pulled muscles in my neck and shoulders. There's so much turning and twisting and reaching for things, you see.

One of the women I watched was showing her new craft room and mentioned in passing that she finally has a table she can stand at and work comfortably, but she never said why. I found out why the hard way.You cannot sit and papercraft.

Thanks to an accident ten years ago, standing for long periods is not good for me, so I'm looking for a solution - probably something along the line of a bar height table (I'm 5'8") with a stool that I can lean on.

And I also have to get very organised so that I can find -and reach- all of this stuff that I'm spending a fortune on. Papercrafting is fun and creative and wonderful and relaxing, but it's also expensive.

Right now, since I'm just starting out and need, well, everything, I'm going to craft stores and buying what's on sale. But do your research. Some products and manufacturers are better than others and spending a little money on products that don't work as well as they should is just a waste of money in  my opinion. Buy the best you can afford (Michael's 50% sales are fantastic) but make sure you're buying good brands.

Michael's Recollections brand of paper, for example, is inexpensive, as paper goes. It's also very thin and the colours don't hold up well. Other Recollections products are very well made, but I do not like the paper at all. If you plan to paint or stain or embellish your work, I think you'd be happier with another brand. I'm liking DCWV (Die Cuts With a View), MME (My Mind's Eye) and Graphic45 papers so far.

As I get into this, I'll post what I like and don't like - and if you have any tips, I'd love to hear from you.